Masterclasses

Stella's Photography Tips: Depth of Field

SMS_201805_People_13.jpg

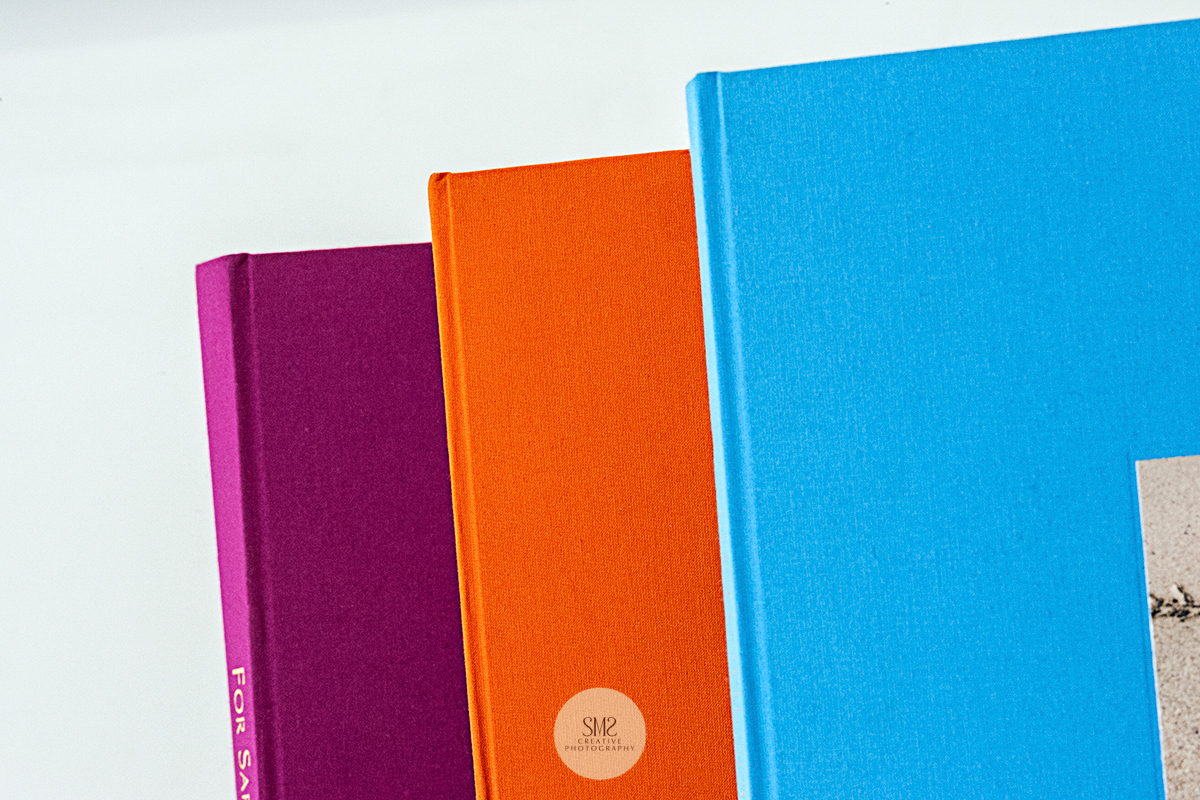
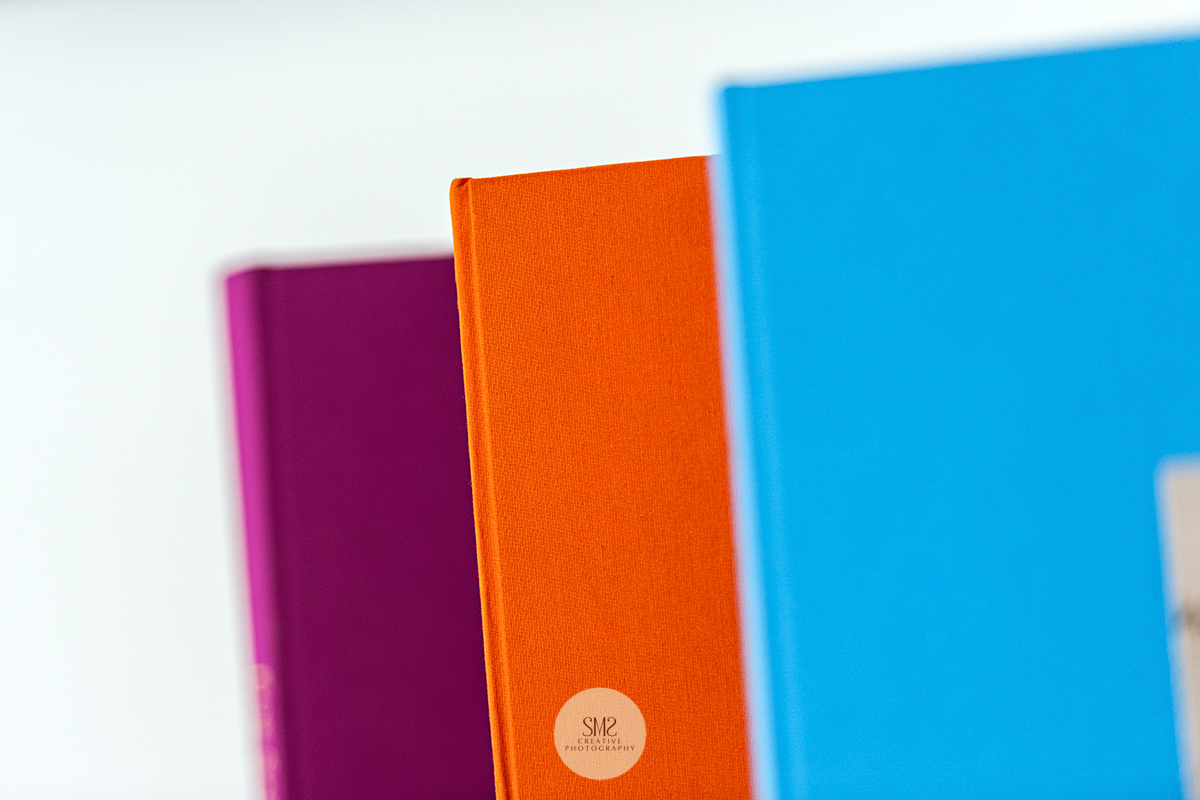
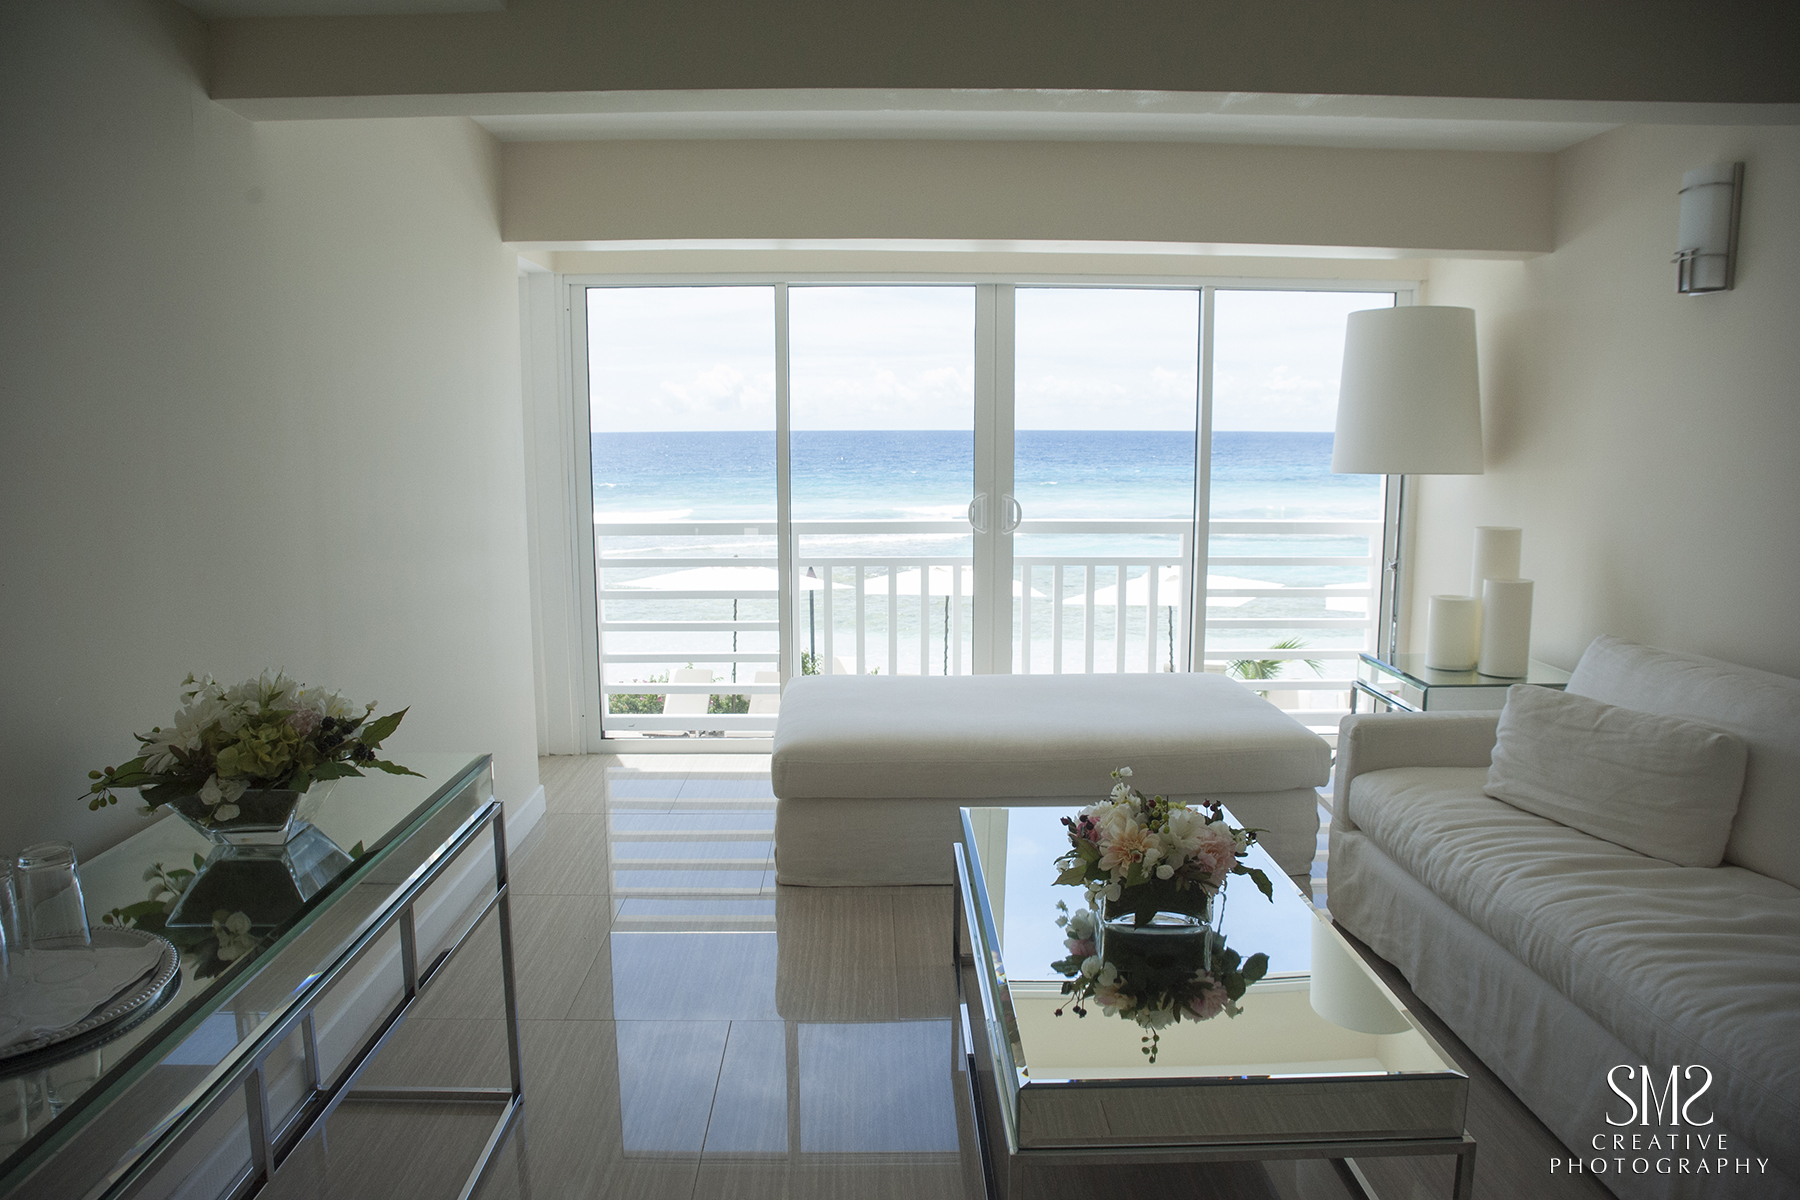
'Depth of field' is the area in your photograph that is in focus from the nearest point to the furthest.

Sometimes we may choose to have an image that is sharp throughout, showing the foreground with the same focus as the background. Alternatively, we can choose to separate the subject from the background by using a shallow depth-of-field to achieve this. Here are my tips to achieve this:

1. Select the correct lens. I would normally chose a 70-200mm - the longer the focal length the shallower the depth-of-field.

2. Use a wide aperture - f2.8 or f4 works best.

3. Position your subject at least two metres away from the background to separate the two. The further away your subject is from the background, the more out of focus the background will be.

4. Adjust your shutter speed and ISO accordingly to get the best exposure. Remember not to go below 1/60th to avoid camera shake.

5. The closer you are to your subject, the shallower your depth of field will be. If you are two meters from a subject and shooting at f/2.8 with your 70mm lens, you may get 10cm of depth to your focus. With the same lens and aperture at 10 meters, you may get 100cm of depth.

6. If you are looking to create soft backgrounds with a less than optimal lens such at a 16mm prime, get really close to your subject to achieve the desired results of shallow depth-of-field.

7. Always experiment with different lenses to achieve a variety of results using different subjects.

Stella


Stella's Photography Tips: Shutter Speed

SMS_201804_People_3.jpg

Following on from my photography tips from March, this month I am explaining how to use shutter speed to your advantage, to show motion, either to slow it down or to freeze it. This works particularly well for moments that are fleeting, for example as shown here with the flow of water, the same principals apply for sports photography.

Simply follow the steps below and enjoy the experiment!

1. Depending on how close you are to your subject, this generally works best with a 24mm -120mm so you have varied range of focus. A focal range similar to this is fine - remember there are no hard and fast rules.

2. To show motion, select a slow shutter speed 1/15 of a second and below.

3. It is best to use a tripod to avoid camera shake, or make sure you are leaning against something sturdy to support yourself. Alternatively you can stand with your legs apart and your elbows close to your body to minimise camera shake.

4. Select auto ISO as you maybe restricted with your maximum aperture opening. Just to remind you that ISO controls the sensitivity of light on the digital sensor. Auto ISO will increase or decrease the sensitivity by going up to increase or down to decrease, in numbers from 200 - 400 - 800 - 1600 - 3200. If you prefer you can control this manually.

5. Select you aperture at f5.6 and take the shot, experiment to achieve your desired effect and exposure.

6. To show frozen motion select a fast shutter speed about 1/500 of a second or more.

7. Keep the aperture to f5.6 and the ISO to auto. Take the shot and experiment with different exposures to achieve the desired effect.

If you would like more advice to help you understand your camera one to one, I offer masterclasses tailored to suit your knowledge and ability. Alternatively, you and a friend can take a class with me.

Stella


Stella’s Photography Tips

SMS_201803_People_7.jpg

Introducing....’Stella’s Photography Tips’

If you would like more advice to help you understand your camera one to one, I offer masterclasses tailored to suit your knowledge and ability. Alternatively, you can take a class with a friend.

  1. Get used to operating your camera in manual mode. Once you are familiar with this then you will have the confidence to use shutter priority or aperture priority.

  2. In manual mode you can choose the ISO, shutter speed and aperture to control the desired exposure.

  3. Aperture priority is how the photographer sets the aperture. This is in the lens and operates like the iris of the eye. Make it larger to let more light in and smaller to allow less light in. Once this is set the camera then adapts the shutter speed to allow the correct exposure.

  4. Shutter priority is how the photographer sets the correct shutter speed. The camera automatically sets the correct aperture for the correct exposure.

  5. On both of the above, automatic ISO can be selected, or set at the desired setting to suit the lighting conditions, such as 200 for bright sunny day, 400 for overcast and 1600 for low lighting.

  6. At Spring time on a sunny day I suggest using ISO 400 - Shutter speed 125 – with the aperture set at f11. Use this as a starting point and adapt the shutter speed and aperture accordingly to get the desired exposure.

Stella


Summertime Photography

Stella_Scordellis_summertimephotography3

Whilst you're away sunning yourself or at home relaxing, take time out to enjoy the moment. Grab your camera and photograph something tranquil, you can refer back to my last newsletter if it helps. Once you've got your image just a little post production can make a huge amount of difference to your summertime photography. Let me show you...

The photograph above was taken in the crystal clear waters of the Caribbean in Barbados. It was an overcast day with a storm brewing. The contrast of clear water and the stormy sky were difficult to capture in one shot, but I knew I could improve this in Photoshop.

Stella_Scordellis_summertimephotography5

I always shoot in RAW, the RAW file records a greater number of pixels, giving you more freedom to edit an image. These files need to be processed in Photoshop or Lightroom allowing you much more creativity. Using layers like Levels and Curves, Hues/Saturation and Shadows/Highlights, the image can look infinitely better and true to what you had seen.

Don't be afraid to experiment. The photograph below is the end result, which in my mind is true to what I saw.

Stella_Scordellis_summertimephotography4

The same goes for the photograph below taken at the Soco Hotel Hastings, Barbados. It's not possible to capture an even exposure for the out and inside in one image, this can be achieved by using HDR which I mentioned in my previous newsletter . However without the use of a tripod to shoot multiple images you can still achieve this in one shot. You will need to enhance the exterior view by using the techniques mentioned above and below.

Using a layer mask and playing with a levels adjustment layer I have been able to retrieve the data lost by the harsh sunlight in contrast to the shade inside.

The final image below gives a pleasing result.

I hope this has been useful and has set you on your way in post production, for others of you who are more advanced, keep experimenting, it's the best way to learn as you can find some original tool combinations by making errors.

Enjoy the weekend, I'll be back in two weeks time with more news. Bye for now!

Stella

Are You Getting The Best Out Of Your Camera This Summer?

The summer time is a good time of year to understand how to get the best out of your camera. Especially if you feel your camera controls you. With digital cameras being so sophisticated it's worth getting back to basics, do you remember when all you had to think about was:-

1. Putting film in your camera. 2. What shutter speed should I choose. 3. Which aperture should I use. 4. Focus and shoot.

It isn't too different now, just remember to set your camera to M for manual so you can take control.

With automatic focus this is something you don't have to worry about, these few simple tips will set you on your way.

Fisherman walking along Barbados beach1
Light Metre Display

A very useful tool to use is your lightmetre, you'll see this displayed at the bottom of your view finder, it is so helpful, just make sure the arrow is around the centre 0, by adjusting your shutter speed and aperture. It will look something like the diagram above. A good starting point on a cloudy day is F8 (aperture) at 1/125 (shutter speed) with your ISO set to 400 or use auto setting for this. The picture below shows what your histogram looks like on the back of your camera, a useful tool to check your exposure, a peak similar to the below shows an evenly exposed image.

DSCF0329c

If this is all Greek to you and you think you could, or someone you know could benefit from my one to one two hour classes, just call the studio on 01883 722282 or click on this link to find out more.

Enjoy the weekend, I'll be back in two weeks time with more news. Bye for now!

Stella

Fiat Step by Step Photo Shoot

As well as photographing people and events I also get to photograph another of my passions, classic and supercars.

A couple of years ago I was commissioned to photograph a private collection of classic and supercars as a special gift to the owner from his wife, so he could see and appreciate his collection all together in one place. The result was a beautiful handcrafted, limited edition photography book.

It was important to me to make sure that we had planned where each car was to be photographed - the location, the time of day and the lighting, the rest is instinctive. There were over 20 cars in the collection and each one had it's own character I wanted to showcase.

Every location chosen had a special meaning to the owners and each came with it's own challenges, but one in particular stayed in my mind and it's this one I'd like to share with you, the Fiats - their two everyday cars, that they most probably have spent most time in.

The photographs below give a brief outline of the step by step process I went through to get to the end result.

I chose to do this shoot at the beginning of May so we could spend the afternoon setting up in preparation for when the sun went down. I had postponed this numerous times as the conditions weren't right. The first photograph above shows the cars in position.

The above photograph shows the angle I positioned my tripod with the Nikon D700 firmly attached, the lens I used was the 24-120mm. I set my Nikon SB910 speed light remotely inside the Fiat Abarth, with lighting at the front and either side of the cars. There was a flicker of light from the house and a couple of domestic outside lights too.

98bc8b4f-9365-48e4-90dc-a78560cfebd1

As the sun began to set an additional light was added in the outside seating area, with a flicker from the tea lights on the table and to the right of the house as well.

From the image above you will notice that lights have been added to the tree on the left and another garden light to match the one on the right. Many exposures were taken so I could check the lighting was just how I wanted it, my lighting technician was very patient as we balanced the lights to compliment the lighting inside the house. It was precision timing to balance this before we had lost all the natural light.

The end result below, is just as I had imagined, with some careful tweaking in Photoshop to achieve the results I wanted below.

8a0b7269-1221-44f6-83cb-27c28dc31624

Exhibition

This photograph and others from the book will be featured at the RAC in Pall Mall in the Autumn, with the opportunity to buy limited edition framed photographs. A small selection will also be on display at Hever Castle for Father's Day on Sunday 21 June 2015. I'll keep you posted as we get nearer the time.

If after reading this it has inspired you to commission a shoot please do get in touch.

Thanks for reading, I'll be back in two weeks time with more news.

Happy Easter.

Stella